Wednesday, December 24, 2008

What's Christmas Without Trifle

Trifle - Sweet and refreshing on a hot, Darwin Christmas. This recipe is ideal for those who want to say that they made it but the truth is, they only assembled it all together.

Trifle
1 jam roll
2 packets portwine/raspberry jelly (follow manufacturer's direction and allow to set)
1 litre custard (I made mine with 2/3 cup of custard powder and 1 litre of milk, boiled until it thickens and let to cool)
500gm fruit salad in syrup (drained, and reserve the syrup)
600ml cream

Method:
  1. Cut jam roll into 1cm slices.
  2. Line half the jam rolls into glass bowl,
  3. Drizzle 1/3 of the fruit salad syrup over the jam roll slices.
  4. Cut jelly into cubes and fill the glass bowl with half the amount of jelly made.
  5. Pour the custard over the jelly.
  6. Top with half the drained fruit salad.
  7. Place the remaining jam rolls on top of the fruit salad layer.
  8. Repeat steps 4 - 6.
  9. Whip cream until cream almost triple in volume (but before it turns into butter)
  10. Using the spatula, layer the cream on top of the trifle.

Note: No cream layer in my pic as it was nearly overflowing, and my partner has to take it into work so I didn't want cream all over the car.

Christmas - A Time to Get Drunk

Christmas - drinking with family and friends which kinda inspired me to make these rum balls. However as I don't take alcohol and neither should I compromise my partner's and his workmates' work ethics as paramedics, I thought I had better substitute it with rum essence

Rum balls

250gm plain biscuits (Arnott's Arrowroot, Marie and Nice biscuits would do fine)
3 tbsp cocoa
1 tbsp rum essence (or the real stuff)
395ml condensed milk (1 tin)
1 cup desicated coconut
Extra desicated coconut, cocoa, or chopped nuts, for decoration

Method:
  1. Process the biscuits in a blender until they resemble bread crumbs.
  2. Add in the desicated coconut.
  3. Sift in the cocoa.
  4. Add the rum and condensed milk into the mixture and stir until the mixture sticks together.
  5. Roll into balls and roll over the extra desicated coconut (or cocoa or chopped nuts) for decoration.

Colour of Christmas

Been deprived of my decorating set for so long that I decided to make cupcakes - only so that I can decorate them. I went through some websites and found ideas on what to decorate on my cupcakes, and because I couldn't decide which ones I wanted, I ended up with all of them.

Cupcakes
250 gm butter
1 1/2 cup sugar
5 egges
2 tsp vanilla essence
1 1/2 cups plain flour
1/2 cup self raising flour
1 1/2 tsp baking powder
370ml milk

Method:
  1. Cream butter and sugar together
  2. Add eggs, one at a time, beating well after each addition.
  3. Add in vanilla essence and beat well.
  4. Sift the flour and baking powder together.
  5. Add the flour in 3 portions along with the milk, and mix well, starting and finishing off with the flour.
  6. Bake in a preheated oven at 180 degrees Celcius for 20-25 mins.
Glace:
1 1/2 cups icing sugar
2 tbsp boiling water
1 tbsp milk
20gm butter (softened)
  1. Sift icing sugar into a bowl.
  2. Make a well in the centre of the icing sugar and add in butter, and 1 tbsp boiling water.
  3. Stir until well combined.
  4. Add milk and stir until well combined.
  5. If more water is required to acquire the right consistency, then add in some more boiling water and stir.
  6. Colour icing as desired and coat the cupcake tops.
Note: Making the glazing is optional. I only did it because I wanted a coloured surface to place my buttercream decorations. If using this step, place the iced cupcakes into the fridge for 10 mins so the icing glace can harden.

Buttercream:
120gm icing sugar
240gm butter
colouring
  1. Sift icing sugar into a bowl.
  2. Add the butter and beat until the butter achieve a pale ivory colour.
  3. Colour as required and decorate (the fun bit)

Christmas once again

It's been a long time but with Christmas holidays here, and having just resigned from my job (as I got a new position), I finally found my baking & decorating hobby once again.


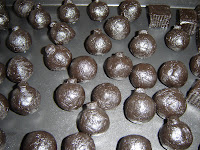
Oreo Truffles

250gm Philadelphia Cream Cheese (softened)
3 packets of Oreo cookies (39 pieces of oreos)
Method:
  1. Place the Oreo's (including the sandwiched cream) into a blender and blend until finely processed.
  2. Place Oreo's into large mixing bowl.
  3. Combine the softened Cream cheese with the Oreo's until thoroughly combined.
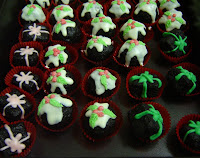
  4. Roll into balls, or shape them into the desired shape. Place into fridge for 10mins or freezer for 5 mins before decorating with icing.

*DO NOT place the cream cheese along with the Oreo's into the blender otherwise when oil starts weeping out in big droplets, don't say that you haven't been warned.

Icing:
Heat white chocolate as per directions on the packet. Add in peppermint oil once the chocolate is melted. Colour and decorate truffles as desired.

Tuesday, June 3, 2008

Cheesecake makes baking worth it

I love making cheesecakes, especially after I learnt that cream cheese DO NOT belong in the freezer. I love the way that they form so effortlessly and I have discovered that no-bake cheesecakes are not so bad afterall and they are so much easier to make, without having to worry if the water from the bain-marie has seeped into the springform and destroyed my hard-nights' labour.

I made this in an attempt to renew my faith in myself over the past disasters. It didn't turn out so bad. Plus it was also an attempt to ponder what I will/can make with my new KitchenAid that I redeemed from my flybuy points plus paid $400 for. Well worth the money *dancing on the bed because I am overjoyed at my new purchase* It's coming in 4 weeks, Yippee.

NO-BAKE TRIPLE CHOCOLATE CHEESE CAKE


Ingredients
180gm marie biscuits
1 tbsp castor sugar
1 tbsp cocoa powder / milo
90gm butter, melted
80ml warm water
1 1/2 tbsp gelatine
400ml whipping cream
3 tbsp castor sugar
500gm cream cheese
1/2 cup castor sugar
60gm dark chocolate
100gm milk chocolate
80gm white chocolate

Method:
  1. In a food processor, blend the biscuits, sugar and cocoa powder together until they resemble fine, sandy crumbs.
  2. Add in the melted butter and pulse the food processor for a few seconds until they resemble slightly wet sand grains.
  3. Remove the biscuit crumbs and press well onto a 23cm springform pan.
  4. Add gelatine to water and put it over the stove until the gelatin dissolves. Set aside to cool slightly.
  5. In a bowl, whisk the whipping cream and 3 tbsp of sugar together until soft peaks form. Set aside.
  6. In another bowl, whisk the cream cheese and 1/2 cup sugar together until creamy.
  7. Add the gelatine mixture into the cream cheese and beat until well combined.
  8. Fold in the whipped cream into the cream cheese mixture. Gently beat it to combine the cream cheese with the whipped cream.
  9. Divide the mixture into three equal parts.
  10. Pour the slightly warm dark chocolate into one part of the mixture while beating it with one beater attachment (on a handheld beater) until thoroughly mixed through. Pour into the springform pan over the biscuits.
  11. Using a spatula, smooth the layer until it is reasonable flat.
  12. Repeat steps 10 & 11 with the milk chocolate, pouring it over the dark chocolate layer.
  13. Repeat steps 10 & 11 with the white chocolate, pouring it over the milk chocolate layer.
  14. Cover the top of the springform pan in foil and place it into the fridge for at least 4 hours.

Note:

*DO NOT pour chocolate into the cream cheese mixture without beating it immediately, otherwise you'll have small (or large) pieces of chocolate - unless you want it to be a chocolate chip cheesecake. The milk chocolate layer turned out a little like chocolate chip cookie and tasted pretty good actually.

*I used leftover white chocolate with 2-3 drops of food colouring from my previous cooking to draw concentric circles with a piping bag. Then I ran a skewer from the side of the cake towards the center and then in the opposite direction around the cake to produce the spider web effect.

A Disastrous Weekend

Few weeks ago, I decided to make pandan steamed cupcakes, fatt koh and blossom cake - all of which are steamed and supposed to "smile" once the steamer lid is lifted.

Well, mine didn't smile and instead, made me grumpy for the rest of the week, and has prevented me from coming back to my blog because I hate to admit that I have failed miserably in making things "smile" and to add insult to injury, mum and dad weren't particular helpful in making me cheerful either.

So here is the best of my three efforts. The latter 2 were nearly unedible. But I have seen yochana's site and her blossom cake looked amazing - unlike mine.

Pandan Steamed Cupcakes

No recipe until I perfect this one.

Finally

Well, my mum's birthday has been and gone (28th April) and I still haven't updated my site with her cake. Oh, I took the whole-cake pic with another camera so I can't upload the pic just yet. With this camera, I remembered to take a photo when it was already half eaten

It was nothing elaborate since I did it last minute and she doesn't enjoy the sweet richness of icing and butter cakes. So instead, I had to make a cheesecake and it can't be just any ol' no-bake cheesecake, it had to be one that has been in a bain-marie for about 1hr.

Marbled Baked Cheesecake


Ingredients:
500gm softened cream cheese
50gm castor sugar
5 eggs, separated
zest of 1 lemon
1 tsp lemon juice
230gm whipped cream
120gm plain flour
120gm castor sugar
50gm melted milk chocolate
1 tbsp milk

Method
  1. Beat the softened cream cheese with the 50gm of castor sugar until fluffy.
  2. Add each egg yolk, one at a time into the cream cheese mixture, beating well after each addition.
  3. Add in the lemon zest and juice.
  4. Using a spatula, fold in the whipped cream into the cream cheese mixture.
  5. Sift in the plain flour and fold until well combined.
  6. In a separate, greasefree bowl, beat the 5 egg withes with the remaining castor sugar until soft peak forms.
  7. Fold the egg whites into the cream cheese mixture.
  8. Beat in milk until the mixture is smooth and well combined.
  9. Remove 200gm of cream cheese mixture and quickly mix in the melted chocolate.
  10. Dollop some white cream cheese mixture followed by the chocolate cream cheese mixture into the spring form pan. Swirl patterns with a skewer if desired.

Note:

*Do not pour in chocolate and let it stand while you finish scraping the bowl or the like, otherwise the chocolate will set in the cooler cream cheese mixture and you'll have little clumps of chocolate.

*I have poured the chocolate mixture on the base and saved about 2 tablespoon of the mixture, then poured on the white mixture. Using the remaining chocolate mixture, I have placed it in a piping bag and drew little circly patterns and swirled it with a skewer. Chocolate icing made from piping and floodwork: Melted white chocolate with a bit of pink colouring for the letter flooding. Melted milk chocolate for the borders.

Tuesday, March 25, 2008

Last Minute Present


Well, two Sundays ago was one of niece's birthday. I knew I had to bake her a cake as I had done so for my other niece. However, I had a big exam on Saturday from 8am - 4pm so I knew I had to buy the cake. Luckily the party was on Sunday morning, but that will not allow me time to bake the cake, freeze it, ice it and cover it with icing.

Anyway, from my previous experiences, sponge cake is just not something that I can perfect in a day so straight after the exam, I went to buy a Woolies sponge cake because their's taste the best. I got all my sugarpaste and stuff ready and by the time I got home and was ready with all my ingredients and all, it was already 6:30pm.

This post should have been put up earlier but I got tied up with other stuff, but my friend had emailed me this morning with "it has been 4 days of holidays, and there's nothing new in your blog", so guilty conscience has me posting it up tonight.

This was a cheat's cake - bought the sponge cake, bought the icing (Orchard's) and all I had to do was decorate, beat up butter with icing sugar and a bit of vanilla essence until the right consistency, and roll a bit of rosewater essence into my fondant icing and WA-LAH, my present to the lil' birthday girl.


Oh, it was a kiddy party, my sis and her two ratbags were invited so I had asked my sis to take it but unfortunately, my other niece fell sick in the morning and so they never went to their cousin's birthday. So I had to end up dropping it off at the venue but I didn't stay as I had other stuff to do. But although it was a present to the birthday girl, she has extreme allergies and can't take any dairy or gluten products. Unfortunately, she could, at most, just admire the present, but her mum baked her a special gluten-free, dairy-free, egg-free kinda cake so I don't think she missed out on much.

Wednesday, February 13, 2008

A Little Kid Again

Well I came across Lorraine's site and I have to say, she's a wonderful artist and I admire her skills in creating such adorable menageries and sculptures.

So I thought I'll give sculpturing a go. Knowing how clumbsy I can be with my fingers, and also that tomorrow is Valentine's day, I thought I need to make a teddy or something cute - FAST. The dilemma, however, was that I have work tomorrow and I only got about 2 hours to go before bed time, and I don't have any sugarpaste at home, and the shops are already closed.

So I thought to myself, I'll just go the ol' cheapo version - PLAYDOUGH. Hahaha. Quickly found myself a recipe on the internet and started playing. *giggles* Reminds me of the plasticine that I used to play with when I was a lil tacker. But I hated the chemical-ly smell it left on my hands. At that time, I didn't know about home-made playdough until I was in college. Otherwise, my poor mum will have me hassling her to make me some playdough to play with everyday.

Made my Valentine sculptures and showed it to bf. We just had a good laugh, took a few pics and disembodied the figurines again. I must say that the playdough is not as easy to handle as icing is. The dough is much thicker and stickier and it doesn't produce the delicate and smooth textures that are produced from sugarpaste/icing.

HAPPY VALENTINES EVERYONE


Playdough recipe (for those interested)
2 cups flour (I used self-raising as I ran out of plain flour)
1 cup salt
2 tbsp oil
1 tsp cream of tartar

Method
  1. Combine all ingredients and put it over the stove at a medium heat for about 10 mins or until the dough starts to clump onto the wooden spoon.
  2. Take dough off the stove and allow to cool a little.
  3. If the dough still very sticky to the touch, grab a handful of flour and knead with your hands. Repeat if necessary.
  4. Mix colouring if desired.
  5. Use your imagination to create sculptures with the playdough or give it to your kids.
  6. Store in fridge when not in use.

Saturday, February 9, 2008

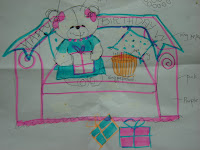
First and Last time of cake decoration


Well I came to a conclusion today - that I am hopeless at spongecakes. Over 30 eggs and only one cake was successful - the one obtained from the shops.

First time:

  • Making a successful yam filling and yam cream
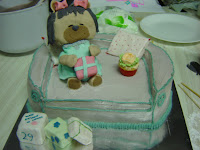
  • Making a 3D Novelty cake
  • Making a cake for a friend's birthday
  • Using rolled icing - I couldn't do this too well, my head was a bit of a mess on the teddy's right cheek and I had to therefore, make the hair. The skirt at the back was a bit of a mess too but hopefully no one sees it.
  • Using whipped cream to make icing
  • Putting my flower cutter into good use for flowers on presents and teddy's neck
Last time and the don'ts of cake decoration:

  • Trying to make spongecakes overnight
  • Turning off the aircon when the cream is left sitting on the table as it WILL melt into a mess
  • Combining whipped cream icing and fondant icing - it just does not mix in this humid weather and you will only find that out the next day because after placing it in the fridge, the icing goes a bit soft and then the cream will be covered with a film of condensation running off the icing! Try buttercream instead. However, whipped cream feels a bit more light and airy.
  • Making ALL the objects edible. Next time I'll just make stuff like the pillows, presents and decorative pieces from fondant and styrofoam, instead of making everything edible, but I don't really like the idea of stuff that isn't edible to be presented on the cake so it may take me a few takes before I am really convinced that I shouldn't make EVERYTHING edible.
Things turned from bad to worse on Friday - I didn't want to go out on Friday but my partner convinced that I should so we went out until 10pm before I got home. So my disaster began because I was tired and rushed so my first sponge was flat and so I made my second one. My second turned out to be uncooked in the middle only after I had it cooled after an hour. So I followed a different recipe but I ran out of custard powder and had to make a small sized custard sponge.

Things did not go too well on Saturday either - Woke up bright and early to start on my forth sponge. Didn't put in the sugar in the meringue so it wasn't holding up and became all runny but I realised my mistake before putting it in the oven. So after the fifth attempt, you'd think that I would near-perfected it but nope, middle was uncooked. Only the sixth attempt was successful but the texture is not the finer sponge type that I like.

Sunday - well today is the day that I have to present the cake and it's slightly wet after being in the fridge overnight. The whipping cream icing cracked and I had to patch it up and made a slight mess of it but I think it's still presentable. Another 6 hours to go before it all disappears (or gets thrown in the bin).

So after all these attemps, I have come to the conclusion that spongecake-making is a skill I have yet to master. At the moment, my cake is in bits and pieces as the only sponge I could get from the shops were all small round ones so I had to cut and model the sponges. It would be much easier using a slab of cake. And the sponges only came in vanilla or choc, but I wanted mine to be yam flavour!

I hope the whole cake will be ok. There are about 4 different types of cakes used for the presents, pillows, the teddy's head and body and the sofa. It would have been so much easier if I can just make my own next time.

Friday, February 8, 2008

Junior Cheesecake

No, it is not a small-sized version cheesecake that you give to a toddler, it is actually the name of this baked cheesecake.

I had previously came across cheap 2-pack cream cheese for sale, which still has until May before it expires. So I bought 2 lots. Shortly after, I realised that they were cheap because they no longer sell them in 2-packs anymore. Anyway, so I thought it will not keep as well in the fridge and stupidly, went and placed it in the freezer for 2 months. It was only when I tried using a pack for my muffin toppings (posted earlier last month) that I realised that they were crumbly and grainy in texture. So I jumped on the net and realised my mistake - cream cheese DOES NOT belong in the freezer.

Panic set in and what was I going to do with these three packets? So I frantically searched more web sites and luckily came across on that said that I may be able to salvage it if I use a lot of other full-fat content ingredients. Therefore this cake is rich, but tasty. But prepared to have lots of cream cheese handy.

Junior Cheesecake


Ingredients:
100gm biscuit crumbs (I used Marie biscuits processed through the blender)
50gm castor sugar
100gm butter (melted)
750gm cream cheese
280gm sugar
40gm cornstarch
1 tbsp vanilla essence
1/2 cup heavy whilpping cream
2 eggs

Method:

  1. Combine the biscuit crumbs, sugar and butter together.
  2. Press the biscuits onto the bottom of a springform pan.
  3. Place into a preheated oven for 8-10 minutes at 180 Celcius.
  4. Remove the pan from the oven and allow to cool.
  5. In a mixing bowl, beat a third of the cream cheese and a third of the sugar with the cornstarch. Beat for at least 3 mins.
  6. Add the remaining cream cheese and continue to beat, whilst adding the remaining sugar, a bit at a time.
  7. Add the vanilla and cream to the mixture.
  8. Blend in the eggs.
  9. Pour mixture over biscuit base.
  10. Place springform pan back into the oven for 1 hour, in a bain-marie waterbath filled with boiling water
  11. Allow cheesecake to cool and place in fridge overnight.
NB:
  • The mixture that comes out of the oven may appear a bit soft and slightly shaky when moved. However, this is ok. It will firm up overnight.
  • I used raspberry jam as decorations. Dollop raspberry jam every here and there and draw a tail in each dollop before you place the cheesecake into the oven. Or use your own imagination.

Sunday, February 3, 2008

Browning Bananas

My partner's bananas were browning and beginning to freeze as it got pushed towards the back of our fridge as we go shopping each day. So instead of chucking it out on our bin-day on Friday, he asked me to make banana cake - only time he's ever asked me to make any cakes. I ended up making muffins instead.

I love making butter cakes, because it never goes wrong and it always tastes perfect, if not just-good. I basically put in whatever basic ingredients I have left in my pantry as my partner has been complaining that I have too many baking ingredients everywhere. But it is a vicious circle because now that I have finished using them, I need to get more for next time.

Banana muffins


Ingredients:
250gm butter
1 cup sugar
5 eggs
5 tbsp milk
2 tsp vanilla essence
2 cups plain flour
1 1/2 tsp baking powder
1 1/2 tsp bicarbonate soda
3 bananas (approx 280gm mashed)
choc chips

Method:

  1. Cream butter and sugar until creamy.
  2. Add one eggs at a time to the butter mixture, beating with an electric beater after each addition.
  3. Add milk, vanilla essence and beat until well combined.
  4. Sift the flour, powder and bicarbonate soda. Add about 1/2 cup flour to the butter mixture and beat well after each addition until all the flours are added.
  5. Add mashed bananas to the mixture and mix well.
  6. Batter should hold its shape when combined.
  7. Line a 12-muffin pan with liners, and fill liners with 3/4 full of batter.
  8. Drop about 5-8 tiny choc chips (or to your taste) on top of each muffin batter.
  9. Place muffin tray into a pre-heated oven at 180 degrees Celcius for 20-25 mins, or until a skewer comes out clean when inserted.

Australia Day

Ok, Australia Day was last week, but I never got the chance to post this up. After a suggestion from my friend, I decided to make lamingtons. Lamingtons is cut sponge coated in chocolate and then coated in shredded coconut. I don't know how it is an Australian-y treat, but it gave Australia the "lamington-drive" for charity runs.

After endless search of a good sponge recipe with very little butter, I finally found one, but have tweaked it a little. The coating was a little runny, and after making it, I realised that other recipes uses butter, so mine soaked into the cake a little, but it tasted alright. However, next time, I'll try the butter and chocolate recipes. Anyway, enjoy the recipe.

Lamingtons


Ingredients:
5 eggs
3/4 cup sugar
1 cup self raising flour
1 tablespoon cornflour
1/3 cup warm water (not hot off the kettle)
13g softenedbutter

Method:

  1. Add the butter into the cup of water, and allow the butter to melt in the water.
  2. Beat eggs it has doubled and almost tripled in volume whilst adding a little sugar at a time until all sugar has been added. This takes roughly 10 mins.
  3. Sift flours into the egg mixture and fold until combined.
  4. Add the butter-water into the mixture and fold gently but quickly.
  5. Pour mixture into a pre-lined 8" round baking tin.
  6. Place tin in a preheated oven at 180 degrees Celcius for 25 mins.

Icing ingredients:
3 cups icing sugar
1/2 cup cocoa powder
1 tbsp hot water
2 tbsp milk

Method:

  1. Sift icing sugar and cocoa powder together into a bowl.
  2. Add milk and enough water to make the cocoa mixture into an icing consistency.
  3. Dip the sides of the cut and cooled squares of sponge cakes into the icing.
  4. Place on a bed of shredded coconut and roll lamingtons in the coconut until well covered.

Monday, January 21, 2008

Things to do with eggs. Part 2

Eggs, I just wish people sell just egg yolks or just egg whites, especially the former, as I know you can get powdered egg whites nowadays. But I am still unable to get my hands on some. The closest thing I have seen to powdered egg whites is ‘Pavlova Magic’ which comes in a cute egg shaped container but I am a sceptic to those prepared stuff as I enjoy making stuff from scratch.

I am digressing. My last post was on macaroons which only used the egg whites, so what was I going to do with the delicious but high-cholesterol egg yolks? It would be too boring if I just fried it so I decided to make egg tarts (adapted from Agnes Chang’s Delightful Snacks and Dim Sum).

I have made the egg tarts using the book recipe several times. However, she has also produced a video cd for egg tarts and that recipe is slightly different from the one in the book. So I decided to give the vcd recipe a try. But having done both, I have to say that the book recipe is much tastier and much easier to make.

Egg Tarts


Ingredients:
Water skin:
150gm plain flour
20gm custard powder
30gm icing sugar
60gm copha / vegetable shortening
2-3 tbsp water

Oil skin:
90gm plain flour
60gm copha / vegetable shortening

Filling:
3 eggs
120gm castor sugar
250ml hot water
2 tsp vanilla essence
1 tsp white vinegar
2 drops yellow colouring

Method:
  1. Skin A: Sift all flour. Mix and knead all skin A ingredients together into a pliable dough. Do not add all the water in at once. Pour enough to make a pliable dough. Divide into 20 parts.
  2. Skin B: Sift the flour. Mix and knead all skin B ingredients together into a pliable dough. Divide into 20 parts.
  3. Let the dough rest for 15 minutes. Meanwhile add the sugar into the hot water for the filling and allow it to cool while preparing steps 4 to 7.
  4. Wrap one portion of dough B inside one portion of dough A, and roll into a fat sausage of approx 8 - 10cm long, ensuring dough B does not spill out.
  5. Lightly roll the sausage-shaped dough with a rolling pin. Then roll it up like a swiss roll.
  6. Roll the mini swiss-roll dough into a ball and press into the egg tart mould.
  7. Repeat steps 3 to 5 with the remaining dough.
  8. Beat the eggs for the filing and combine it with the syrup prepared earlier (step 3).
  9. Combine all filling ingredients and strain filling.
  10. Pour filling into moulds until 3/4 full.
  11. Bake in a pre-heated oven at 180 degrees Celcius for 15 - 20 minutes or until the filling is set.

Note:

  • To determine if the filling is set, shake the mould and if the filling doesn't waver like liquid, then it is set.
  • Another way to determine if the filling is set is when you start seeing the filling starting to puff upwards, remove the tart from the oven immedietely otherwise when your filling rises too high, it may pop and when it deflates, the egg tart will not look too pretty.
  • If, in step 1, you have added all the water and the skin is too wet and sticky, add in more flour and continue to knead. The skin dough should not be sticky when touched.

Things to do with eggs. Part 1

Eggs - so versatile and so easy to whip up. I can't imagine baking without eggs in my fridge. But they are becoming so expensive, that I just get them from the markets nowadays. And getting it at the markets are not cheap either - $8.50 for a tray of 30 but they are not exactly the large ones either! That will only last me, uhmmm, 2 weeks if I don't use it for breakfast/lunch/dinner.

I wanted to try making macaroons. There seems to be such a craze for these delectable, cute, little morsels and I can't get them from where I live. So the only way to taste them is to make them myself. After researching many food blogs, I got the gist that it is just meringue, sugar and ground nuts as the basic ingredients. But if I use the egg whites for the meringue, what can I do with the egg yolks!!! That will be another story.

So I went in search for almond meal, but they were roughly $4.00 for a packet of 100gm. So cheapskate me decided to buy peanuts and ground it myself. Although most people will buy unsalted peanuts, I went for the easiest and cheapest types of nuts, which was of course roasted, salted peanuts. It saved me the trouble of having to roast it myself *grins*

Peanut Choc Macaroon

Ingredients:
1 1/3 cups unsalted peanuts (122 grams)
2 cups icing sugar
1/4 cup sugar
4 large egg whites

Method
  1. Ground the peanuts and the icing sugar together until they resemble almond meal. (Most recipes uses ground almond meal).
  2. Pour mixture into a large mixing bowl.
  3. In a greasefree bowl, place the egg whites and whisk until soft peaks form (usually 2 minutes on high speed), then slowly add in the sugar while continuing to beat on a medium speed for another minute until hard peaks form.
  4. Continue beating the eggs on the lowest speed for half a minute so that the air trapped within are finer.
  5. Add 1/4 of the meringue into your peanut meal and fold gently but quickly.
  6. Repeat step 5 until the meringue is fully combined with the peanut meal mixture.
  7. The batter should be like molten lava and does not look too fluffly (unlike a pavlova) so do not fret.
  8. Add in any colouring you desire (but I left mine plain).
  9. Place batter into piping bag with a round, size 12 nozzle.
  10. Squeeze batter onto a baking parchment placed on a baking tray, until the circle is roughly 2 - 2.5 cm in diameter.
  11. CRUCIAL POINT: Leave piped batter to stand for 25 mins, to allow the skin to form.
  12. Place in a preheated oven and bake for 15 mins at 150 degrees Celcius.
  13. Take out of oven. Allow it to cool on baking tray.
  14. Remove from trays and match similar sized macaroons together.
  15. Sandwich with chocolate cream filling.
  16. Enjoy.

Note:

  • Take note of the crucial point, otherwise you'll end up with macaroons that are pretty sad looking like some of mine (see picture on baking tray, and spot the mishaps) as I didn't read other people's blogs properly and did what I felt like doing. Then I remembered that I read somewhere that the skin must form before placing it in the oven.
  • Chocolate cream filling is just chocolate buttercream leftover from my jaffa cupcakes.