Wednesday, February 13, 2008

A Little Kid Again

Well I came across Lorraine's site and I have to say, she's a wonderful artist and I admire her skills in creating such adorable menageries and sculptures.

So I thought I'll give sculpturing a go. Knowing how clumbsy I can be with my fingers, and also that tomorrow is Valentine's day, I thought I need to make a teddy or something cute - FAST. The dilemma, however, was that I have work tomorrow and I only got about 2 hours to go before bed time, and I don't have any sugarpaste at home, and the shops are already closed.

So I thought to myself, I'll just go the ol' cheapo version - PLAYDOUGH. Hahaha. Quickly found myself a recipe on the internet and started playing. *giggles* Reminds me of the plasticine that I used to play with when I was a lil tacker. But I hated the chemical-ly smell it left on my hands. At that time, I didn't know about home-made playdough until I was in college. Otherwise, my poor mum will have me hassling her to make me some playdough to play with everyday.

Made my Valentine sculptures and showed it to bf. We just had a good laugh, took a few pics and disembodied the figurines again. I must say that the playdough is not as easy to handle as icing is. The dough is much thicker and stickier and it doesn't produce the delicate and smooth textures that are produced from sugarpaste/icing.

HAPPY VALENTINES EVERYONE


Playdough recipe (for those interested)
2 cups flour (I used self-raising as I ran out of plain flour)
1 cup salt
2 tbsp oil
1 tsp cream of tartar

Method
  1. Combine all ingredients and put it over the stove at a medium heat for about 10 mins or until the dough starts to clump onto the wooden spoon.
  2. Take dough off the stove and allow to cool a little.
  3. If the dough still very sticky to the touch, grab a handful of flour and knead with your hands. Repeat if necessary.
  4. Mix colouring if desired.
  5. Use your imagination to create sculptures with the playdough or give it to your kids.
  6. Store in fridge when not in use.

Saturday, February 9, 2008

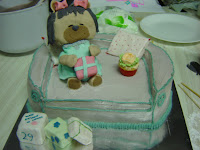
First and Last time of cake decoration


Well I came to a conclusion today - that I am hopeless at spongecakes. Over 30 eggs and only one cake was successful - the one obtained from the shops.

First time:

  • Making a successful yam filling and yam cream
  • Making a 3D Novelty cake
  • Making a cake for a friend's birthday
  • Using rolled icing - I couldn't do this too well, my head was a bit of a mess on the teddy's right cheek and I had to therefore, make the hair. The skirt at the back was a bit of a mess too but hopefully no one sees it.
  • Using whipped cream to make icing
  • Putting my flower cutter into good use for flowers on presents and teddy's neck
Last time and the don'ts of cake decoration:

  • Trying to make spongecakes overnight
  • Turning off the aircon when the cream is left sitting on the table as it WILL melt into a mess
  • Combining whipped cream icing and fondant icing - it just does not mix in this humid weather and you will only find that out the next day because after placing it in the fridge, the icing goes a bit soft and then the cream will be covered with a film of condensation running off the icing! Try buttercream instead. However, whipped cream feels a bit more light and airy.
  • Making ALL the objects edible. Next time I'll just make stuff like the pillows, presents and decorative pieces from fondant and styrofoam, instead of making everything edible, but I don't really like the idea of stuff that isn't edible to be presented on the cake so it may take me a few takes before I am really convinced that I shouldn't make EVERYTHING edible.
Things turned from bad to worse on Friday - I didn't want to go out on Friday but my partner convinced that I should so we went out until 10pm before I got home. So my disaster began because I was tired and rushed so my first sponge was flat and so I made my second one. My second turned out to be uncooked in the middle only after I had it cooled after an hour. So I followed a different recipe but I ran out of custard powder and had to make a small sized custard sponge.

Things did not go too well on Saturday either - Woke up bright and early to start on my forth sponge. Didn't put in the sugar in the meringue so it wasn't holding up and became all runny but I realised my mistake before putting it in the oven. So after the fifth attempt, you'd think that I would near-perfected it but nope, middle was uncooked. Only the sixth attempt was successful but the texture is not the finer sponge type that I like.

Sunday - well today is the day that I have to present the cake and it's slightly wet after being in the fridge overnight. The whipping cream icing cracked and I had to patch it up and made a slight mess of it but I think it's still presentable. Another 6 hours to go before it all disappears (or gets thrown in the bin).

So after all these attemps, I have come to the conclusion that spongecake-making is a skill I have yet to master. At the moment, my cake is in bits and pieces as the only sponge I could get from the shops were all small round ones so I had to cut and model the sponges. It would be much easier using a slab of cake. And the sponges only came in vanilla or choc, but I wanted mine to be yam flavour!

I hope the whole cake will be ok. There are about 4 different types of cakes used for the presents, pillows, the teddy's head and body and the sofa. It would have been so much easier if I can just make my own next time.

Friday, February 8, 2008

Junior Cheesecake

No, it is not a small-sized version cheesecake that you give to a toddler, it is actually the name of this baked cheesecake.

I had previously came across cheap 2-pack cream cheese for sale, which still has until May before it expires. So I bought 2 lots. Shortly after, I realised that they were cheap because they no longer sell them in 2-packs anymore. Anyway, so I thought it will not keep as well in the fridge and stupidly, went and placed it in the freezer for 2 months. It was only when I tried using a pack for my muffin toppings (posted earlier last month) that I realised that they were crumbly and grainy in texture. So I jumped on the net and realised my mistake - cream cheese DOES NOT belong in the freezer.

Panic set in and what was I going to do with these three packets? So I frantically searched more web sites and luckily came across on that said that I may be able to salvage it if I use a lot of other full-fat content ingredients. Therefore this cake is rich, but tasty. But prepared to have lots of cream cheese handy.

Junior Cheesecake


Ingredients:
100gm biscuit crumbs (I used Marie biscuits processed through the blender)
50gm castor sugar
100gm butter (melted)
750gm cream cheese
280gm sugar
40gm cornstarch
1 tbsp vanilla essence
1/2 cup heavy whilpping cream
2 eggs

Method:

  1. Combine the biscuit crumbs, sugar and butter together.
  2. Press the biscuits onto the bottom of a springform pan.
  3. Place into a preheated oven for 8-10 minutes at 180 Celcius.
  4. Remove the pan from the oven and allow to cool.
  5. In a mixing bowl, beat a third of the cream cheese and a third of the sugar with the cornstarch. Beat for at least 3 mins.
  6. Add the remaining cream cheese and continue to beat, whilst adding the remaining sugar, a bit at a time.
  7. Add the vanilla and cream to the mixture.
  8. Blend in the eggs.
  9. Pour mixture over biscuit base.
  10. Place springform pan back into the oven for 1 hour, in a bain-marie waterbath filled with boiling water
  11. Allow cheesecake to cool and place in fridge overnight.
NB:
  • The mixture that comes out of the oven may appear a bit soft and slightly shaky when moved. However, this is ok. It will firm up overnight.
  • I used raspberry jam as decorations. Dollop raspberry jam every here and there and draw a tail in each dollop before you place the cheesecake into the oven. Or use your own imagination.

Sunday, February 3, 2008

Browning Bananas

My partner's bananas were browning and beginning to freeze as it got pushed towards the back of our fridge as we go shopping each day. So instead of chucking it out on our bin-day on Friday, he asked me to make banana cake - only time he's ever asked me to make any cakes. I ended up making muffins instead.

I love making butter cakes, because it never goes wrong and it always tastes perfect, if not just-good. I basically put in whatever basic ingredients I have left in my pantry as my partner has been complaining that I have too many baking ingredients everywhere. But it is a vicious circle because now that I have finished using them, I need to get more for next time.

Banana muffins


Ingredients:
250gm butter
1 cup sugar
5 eggs
5 tbsp milk
2 tsp vanilla essence
2 cups plain flour
1 1/2 tsp baking powder
1 1/2 tsp bicarbonate soda
3 bananas (approx 280gm mashed)
choc chips

Method:

  1. Cream butter and sugar until creamy.
  2. Add one eggs at a time to the butter mixture, beating with an electric beater after each addition.
  3. Add milk, vanilla essence and beat until well combined.
  4. Sift the flour, powder and bicarbonate soda. Add about 1/2 cup flour to the butter mixture and beat well after each addition until all the flours are added.
  5. Add mashed bananas to the mixture and mix well.
  6. Batter should hold its shape when combined.
  7. Line a 12-muffin pan with liners, and fill liners with 3/4 full of batter.
  8. Drop about 5-8 tiny choc chips (or to your taste) on top of each muffin batter.
  9. Place muffin tray into a pre-heated oven at 180 degrees Celcius for 20-25 mins, or until a skewer comes out clean when inserted.

Australia Day

Ok, Australia Day was last week, but I never got the chance to post this up. After a suggestion from my friend, I decided to make lamingtons. Lamingtons is cut sponge coated in chocolate and then coated in shredded coconut. I don't know how it is an Australian-y treat, but it gave Australia the "lamington-drive" for charity runs.

After endless search of a good sponge recipe with very little butter, I finally found one, but have tweaked it a little. The coating was a little runny, and after making it, I realised that other recipes uses butter, so mine soaked into the cake a little, but it tasted alright. However, next time, I'll try the butter and chocolate recipes. Anyway, enjoy the recipe.

Lamingtons


Ingredients:
5 eggs
3/4 cup sugar
1 cup self raising flour
1 tablespoon cornflour
1/3 cup warm water (not hot off the kettle)
13g softenedbutter

Method:

  1. Add the butter into the cup of water, and allow the butter to melt in the water.
  2. Beat eggs it has doubled and almost tripled in volume whilst adding a little sugar at a time until all sugar has been added. This takes roughly 10 mins.
  3. Sift flours into the egg mixture and fold until combined.
  4. Add the butter-water into the mixture and fold gently but quickly.
  5. Pour mixture into a pre-lined 8" round baking tin.
  6. Place tin in a preheated oven at 180 degrees Celcius for 25 mins.

Icing ingredients:
3 cups icing sugar
1/2 cup cocoa powder
1 tbsp hot water
2 tbsp milk

Method:

  1. Sift icing sugar and cocoa powder together into a bowl.
  2. Add milk and enough water to make the cocoa mixture into an icing consistency.
  3. Dip the sides of the cut and cooled squares of sponge cakes into the icing.
  4. Place on a bed of shredded coconut and roll lamingtons in the coconut until well covered.